RJ's Beginner Guide to RV Electrical


Basics of RV Electrical
All RVs have two different electrical systems: a low-voltage, 12v DC power system, and a 120V AC power system.
The key difference is that the 12V DC comes from the RV's battery. So anytime you hear "12v," just think it's "battery powered."
Now if you're plugging something into a wall outlet or using a large appliance like an air conditioner, it will be powered by 120V AC--which is no different than the voltage coming from your house.
12V Battery
Let's take a look at the battery now. If you're new to an RV, you may be shocked to find that you can disconnect from the shore power and still operate certain appliances and technology. The lights will turn on and the vent fans in the bathroom and the living room can turn on as well. Additionally, the hydraulic landing gear and slide-outs also run off the 12V battery.
There are two main types of batteries available for our RVs today, the standard lead acid battery which we're all pretty familiar with, and now more recently in high-end rigs, lithium-ion batteries.
In regards to lead acid batteries, the nominal voltage is 12 V but it fluctuates depending upon the state of charge(how full the battery is). With a full charge, it would top off at around 12.6 to 12.8V but I could also be as low as 9 or 10 V when it's fully depleted.
You will need to do some service work on your RV from time to time, and the first tool you'll need for this is a digital multimeter (DMM). Having the DMM in Volts DC mode, you can use it to measure the voltage across the battery posts by putting the leads on positive and negative.
Now if you don't have a DMM the good thing is is you'll be able to check the battery voltage in generally two locations. If you have an inverter installed there will be a digital display that you can turn on to view what the 12 V battery voltage is providing the inverter. The second way you can do this is to go to your leveling system, turn it on, and scroll up until the battery voltage appears.
We are looking to see if the 12 V lead acid battery has the proper voltage. If the battery is fully charged it would be 12.4 - 12.7V+. With a lead acid battery if it's at 12.0 V you're likely only 50% charged. All of the equipment that runs off of 12 V needs at least 12 V to run in an optimal state.
I'd also recommend if you're checking the 12 V battery be sure to unplug from the shore power which is the 120 V going into the camper this way you've isolated your battery for the test. I recommend checking it at least once a month. Just to understand how they're performing.
Now if you're plugged into shore power there's a trickle charger that charges the battery and if you look at the battery voltage at that point it should be around 13.2 - 13.6V.
Now let's jump over to the lithium-ion battery option. Being different chemistry the batteries in the field today produce more voltage nominally. These batteries will produce between 14.4 V to 14.6 V when they're fully charged. With a lithium-ion battery, you don't have to do the maintenance like other types of batteries because there are no caps or water/fluid that needs to be refilled.
There are a few things to look for in your battery bay. Because lithium-ion batteries do not outgas (hydrogen), you won't have a snorkel as a lead acid battery would. As a result, they don't need to be housed in a snorkel box. But we must inspect the terminals to ensure that they are secure. By slightly moving the wire, you can check to see if there is any movement around the terminal. If so, then it needs to be tightened up. If you start seeing corrosion that's likely one of two things either those terminals are loose or we have a slow discharge constant. I recommend cleaning the terminal and making sure the connection is tight.
That's pretty much it, just keeps those terminals tight, keep the battery clean and make sure everything is shutting down properly and it will function for you.
Expected Battery Life:
Lead Acid: 300 - 500 Charge Cycles = 3 - 5 Years
Lithium-Ion: 4,000 - 5,000+ Charge Cycles = 10 - 12+ Years

Standard 12V RV battery - Deep Cycle Lead-Acid
Lead-Acid Battery Maintenance
If you have an RV that runs on a conventional Lead Acid Battery, there are several basic upkeep procedures to follow. If your battery has caps on the top, it's evidence of a flooded Lead Acid; popping off the caps will reveal the fluid level. With a flathead screwdriver, you can get underneath the cap and just lightly pry it up and off the battery. If the fluid level is low, you'll need to refill your battery with distilled water, which is pure water devoid of minerals.
If you plan to boondock often, check on your battery bank monthly. If you're mostly plugged into Shore power, checking every three months should suffice. Not replacing the water as it drains will decrease the life of the battery significantly; rather than getting 500 cycles, you could get only 300 or 400.
Safety Factor: Wear gloves to avoid contact with chemicals or heavy metals, and goggles to prevent anything from getting into your eyes.
Battery Inspection/Maintenance Tools:
Battery Service Tool: Digital Multimeter (DMM)
Battery Terminal Cleaning: Terminal Cleaner, Terminal Brush, Rubber Gloves
Safety Factor: This is important for both kinds of battery chemistry. Make sure you're wearing gloves when near the battery so you don't get any chemicals or heavy metals(Lead) on your hands.

This top of the line Fluke will last forever. Mine is 15 years old, and still going strong. I recommend you picking one up before an issue comes up!
12V Fuse Panel
The 12V Fuse Panel is simply a junction box that regulates the distribution of electricity from the battery to different circuits to protect them. The fuses used are similar to those found in a car's fuse box.
If you have a section of the lights not working or a fan not operating, check the 12V Fuse panel first to see whether one of the fuses has blown. In many situations, you can tell if a fuse is broken because it is visible through the fuse. If you're unsure, check continuity by removing the fuse from the panel and using a Digital Multimeter (DMM) to measure the resistance across the terminals. A blown fuse will resemble an open circuit with very high resistances. If it has to be replaced, you'll need a new one with the same current rating. For example, if your 10A fuse blows, don't just upgrade to a 20A fuse. It must be changed with the original current rating in place otherwise the wiring harness could get damaged.
Many RV manufacturers have started color-coding their wiring for ease of use. If you need to check the actual wiring, this makes it much simpler. For example, if you're investigating the water heater, its wires are likely green and white; the fans might be blue and red. Be sure to ask for a complete RV wiring diagram from the manufacturer so that you can keep it on file - even if you don't plan to tackle the project yourself down the road, it'll be helpful for whoever does ultimately the work.
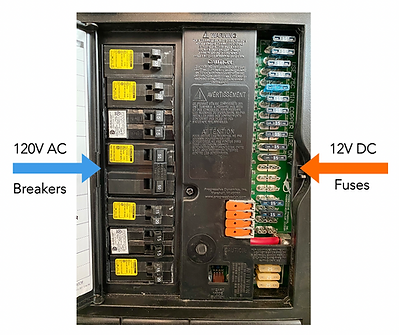
12V Fuse & 120V Breaker Panel
120V AC Power System
120V AC is the same as your household voltage, and there are two ways to get it in an RV: from shore power i.e., being plugged into a power pedestal at a campsite or from an inverter that transforms 12V battery voltages into 120V AC. In both cases, the 120V AC goes straight to the breaker panel box, which distributes to the various circuits around the camper. To fix any issues with outlets or appliances, start by checking the breaker panel to see if any breakers are tripped. If you see a tripped breaker, it means that circuit has been overloaded. Try reducing your overall loading and flipping the switch back on. If it continues to trip, more investigation is needed.
GFCI (Ground Fault Circuit Interrupter) switches are a must for every RV. They help prevent electrical shock by quickly shutting off power to an outlet if they detect a ground fault. As a standard, GFCIs are installed in all bathrooms and anywhere within 6 feet of a sink or other water source inside the RV. If you ever trip a GFCI, then you'll most likely need to shut off the power for the entire circuit at your breaker panel. After that, turn it back on and reset the system. If all of a sudden your kitchen power doesn't work, bathroom outlets aren't working either, and even your outdoor outlets don't have any juice--first, check your GFCI outlet switch (if you have one). If that's not tripped, then check your GFCI breaker.
RV Converter / Battery Charger
When you are plugged into the 120V AC shore power it converts it to 12V DC to charge the battery. To charge the battery it needs to go above the 12V and charge at 13.2V or up to 13.6V. It's important to understand that when you're plugged into shore power the converter is on so the battery voltage will be above the standard 12.4 - 12.7V.
If you decide to swap out your lead-acid battery for Lithium-Ion in the future its important to make sure your Battery Charger is set up to handle that change. Due to Lithium-Ion being at a higher nominal voltage you will need to use a different converter unless you have a charger that toggles from one to the other.
RV Electrical Inverter
Most RVs have a 2000W inverter installed, which allows you to run your 120V items on battery power rather than using shore power. However, if you don't have additional batteries or a generator, this functionality is limited. For example, you might only be able to use it for one day of boondocking. In my experience, I've generally only used the inverter to keep my fridge/freezer running as I'm driving to my next campsite.

12V Battery Powered 2000W Pure 120V Sine Inverter
RV Generator
If you want to put a generator in your recreational vehicle, there are several things to consider. To avoid having two power sources enter your RV, such as shore power and the generator you'll need to install a transfer switch. Only one source of energy will be permitted through this gadget. For example, if you have access to shore power, it will pass through; if it's switched off and the generator is running, the generator power will pass through.
RV Solar
The cost of a solar panel system may vary by thousands of dollars, depending on the size and type of system you select, as well as your location. There are four primary components to consider when purchasing a solar panel system: the battery bank, inverter, solar cells, and solar panel controller. Due to improved capacity, weight reduction, and charge/discharge performance, Lithium-Ion batteries would be required in this case. If you want to power one AC device in addition to normal appliances, you'll need at least a 3000W inverter. The solar panel control regulates the variable charge voltages from the solar panels to ensure that the battery charger is supplying the correct voltage to charge the battery bank. The final element of this equation is all of the wires and cables connecting everything.

In 2021, I uncovered the ultimate way to take my family of four on thrilling excursions around the country without having to forgo our everyday comforts: RV travel!
I am thrilled to be able to share with you the unique experiences and lessons I have learned on my RV trips, alongside a couple of other endeavors I am passionate about: DIY projects, F.I.R.E., and useful life hacks.
-Cheers to the Grand Adventure Ahead!
Disclosure: Some of the articles on this site contain affiliate links. If you decide to buy a paid plan after clicking one of these links, I may receive compensation from the company at no extra cost to you. I only promote products that I've used and approve of myself. The advice given on this website is solely for entertainment and should not be taken as financial guidance. You can read more about our affiliates in our Privacy Policy.